Showing posts with label My Tutorials. Show all posts

My "Inspirations" Journal


I needed a little journal to keep track of all my little "Craft Inspirations" and doodles.
I bought the book for $1 at Joanns. Then I just added a vinyl decal on the cover page. Nothing fancy, just simple!

I can't tell you how often I've used this to keep track of the random crafting ideas I get. In fact this doodle (which will later turn into a craft) was inspired at breakfast while I was at ihop looking at some of the wall decor. Weird...I know! But I just had to sketch the idea before my mommy brain forgot all about it!

I would love to see what you come up with!

Cover Button Kit Tutorial


You can purchase the Cover Button kit at Joanns for around 3 dollars.
They also have many different sizes to choose from.


In this tutorial I used the 3/4 " size.
(I should have used a bigger size for this flower though)

The kit will have a circle on the back of the package. You will need to cut it out. This will become the template for you fabric.

Place the template over your fabric and cut a fabric circle. (You may want to cut two fabric circles if your fabric has a little bit of sheer to it.)

Make sure you center your fabric over the mold. The fabric will need to be wrong side up.

Push the button shell firmly into the mold.

Tuck the extra fabric into the button shell.

Place the back over the tucked fabric. Press firmly with the pusher to snap it into place.

You're finished!!

Fabric Ornaments


Small scraps of fabric torn into strips
Mod Podge
Foam Brush
Any round Ornament
1-Tear your fabric into long strips
2- Apply a generous amount of mod podge on your ornament.
(Any round ornament will do)
3-Quickly wrap the fabric around your ornament before the mod podge dries. If you need to you can apply it as you go.
*You can also do a final coat of mod podge over the fabric if you'd like to seal it. But it doesn't keep the soft fabric texture look.
Enjoy!

Salt Dough Ornaments


(Recipe from Sunday School Ideas)
*She has other great tips, hints and tricks on her website


1 c. salt
1 c. warm water
2 c. flour (use only plain all-purpose flour)

Combine flour and salt in a mixing bowl or kitchen aid. Slowly add ½ the water while stirring. Slowly add more water and continuing to mix and blend, until it creates a ball of dough that is firm and just soft enough to knead. (The exact amount of water will depend on the moisture content of the flour as well as the general humidity in your home as you prepare the recipe.) Turn dough out onto lightly floured surface and knead until smooth. Use cookie cutters and other shaping materials to shape and cut out the dough. Use a straw or wiggle a paper clip into your dough to make a hole in the center for hanging.

"Bake at 250 to 350 degrees Fahrenheit for 1 1/2 to 3 hours. The lower the temperature the longer, but with the higher temperature you run the risk of browning. Of course, there’s no harm in browning them if you don’t mind the color, or if you are going to cover them completely with paint. "

Once they are out of the oven let them cool. I like to sand the edges a little with some sand paper. May sure you brush away all of the crumbs.

We like to use a glaze as a beautiful finishing touch to the ornament. Sculpy makes a shiny and matte finish glaze, or you can also use mod podge or a epoxy resin.

*Remember that the dough will begin to lose its ability to hold fine detail after about an hour.

**Every year our little family likes to handcraft and paint ornaments. We do everything from the sculpy clay ornaments, salt dough ornaments, cinnamon ornaments, to the little ceramic ones you can buy at the store. My children always look forward to it!

How To Make A Custom Desktop Background


1. Find out your screen size. If you are unsure, go to
http://www.whatismyscreenresolution.com/
and it will tell you your screen size.

2. In Photoshop, Gimp, or what ever other photo editing program you like to use..open a new file with the dimensions you were given above for your screen size.

3. Decorate with digital scrapbooking paper, or add photo/s to your new file.

4. Save the file to your computer.

5. Go to Control panel on your computer.

6. Underneath Appearance and Personalization you should see "Change desktop background", click on it.

7. Locate your picture by clicking on the "Browse" Button

8. Highlight your picture then click o.k.

Enjoy your new custom background!

*There are a lot of digital scrapbooking designers who will give away free monthly desktop backgrounds and you can personalize them by simply adding your own pictures.


Homemade Sweet Pea Costume

I made this for my daughter when she was a baby. Her nick name was "Princess Pea". We thought that it would make a cute costume. Way back when (7 years ago) I had a hard time finding any cute pea costumes so I decided to make one.


(I'm sure you can figure this out just by looking at it)
I just took a pair of "Carters" pajamas and undid the embroidered decal of the dinosaur on the front. Then I sewed the little "Peas" and stuffed them with batting, then sewed them to the pajamas. Next, I glued a piece of plastic Ivy to make it look like a pea vine. Then I just made the hat to match, and I added a little plastic Ivy to that.


Punkinheads

Wooden Halloween Pumpkins

Wood
Craft Paints
Foam Brush
Vinyl Lettering (or black construction paper)
Antiquing Ink
Sandpaper

Optional:
Clear finishing spray
Glitter
Scrapbook paper
Mod Podge
Ribbon
Tulle

DOWNLOAD Punkinhead Font HERE
  • Cut the wood into a 5 1/4" x 5 1/4" x 1 1/4" square. Sand the wood using a hand sander or sand paper. Dust off the wood. Paint the wood your desired color (I used 3 different orange variations). My blocks needed two coats of paint. Let dry.
  • Download and install the free Punkinhead font. Using your vinyl plotter cut out desired pumpkin faces making sure to fit the correct wood dimensions. If you don't have a vinyl plotter, cut out shapes on black construction paper.
  • Once your wood block is dry sand the edges and add antiquing ink. You can choose to spray with a shiny or matte finish clear spray. Let dry.
  • Once the wood is completely dry, add your vinyl (or paper).You can finish the block by adding a ribbon, tulle, or cut out a wooden stem and glue to the top.

Variations:
*Add scrapbooking paper to the wood using mod podge.
*Add glitter to your project for a sparkle you will LOVE!


*Please remember to ask if you want to use my posts! It's much appreciated. I'd love to see what you've done with yours. senderikaaletter@hotmail.com

Sunday Snack Bar


(if all else fails, it makes a really cool airplane)

Buy a craft container from walmart/joanns, etc ($1-3). You can also buy small plastic fishing tackle boxes from your local hardware store.
Fill each empty space with small finger foods for your child (age appropriate of course)

-Chocolate Chips
-Little Fishy Crackers
-Mini Marshmallows
-Raisins
-Fruit Snacks
-All kinds of cereal (cheerios, kix, lucky charms,)
-Peanuts
-Craisins
-Small Crackers

*This really helps my two year old quiet down in church. He loves the variety of snacks to choose from. Life saver...seriously!

*My container is actually "Child proof" so he can't get into it all by himself. It's also nice because it won't spill in his diaper bag. You just need to push in the button on the side while opening the container.

DIY Initial Frame


11" x 14" frame
(bought from Walmart for about $3.00)
Bead Board
(bought a LARGE piece from Home Depot, I think it was about $12-14, I can't remember, but this can make TONS)
Initial Letter
(Bought at Roberts Crafts while I was in Utah for about $5)
Ivory Spray Paint
(bought at Home Depot $3)
Old English Scratch Cover For Dark Wood
(bought at walmart by the dusting/cleaning supplies. I think it was about $5)
Rag
(one that you won't care if it gets stained)
Sand Paper
Clear Matte Spray Paint (Optional)

(Most of the stuff we already had on hand, I'm just giving you the price when we bought it)

1- Take out the picture frame glass (find another crafty use for your glass).
2- Trace the piece of glass with a pencil on the back side of the Bead Board.
3- Cut out the bead board with a saw (we used our Miter Saw).
4- Spray paint your bead board with the ivory spray paint (or what ever color you want).
5- While you're waiting fort the spray paint to dry, lightly (or Heavily) distress the outside of the picture frame with your sandpaper.
6- Once the bead board is dry, add a few drops of the Old English liquid on a rag. Spread the stain in between the lines of the bead board. Smudge or lightly wipe the stain according to your taste.
7- You can spray a can of matte sealer to seal in the stain on the bead board if you'd like
8- Glue (gorilla glue, wood glue), nail, or staple gun the Initial to the Bead Board.
(I used a variety of glues to hold it together, gorilla, hot glue, and wood glue, just to make sure it would stay)
9- Place the Bead Board inside the picture frame. Fold down the hardware on the back of the frame to hold into place.
10- Sit back and enjoy your new masterpiece!

* For a different look, you can also Mod Podge fabric or scrap booking paper to the letter before gluing

Glitter Toes


I *LoVe* Glittery Goodness!


Items Needed:
Glitter
Clear Top Coat
Colored Base Coat
Wax Paper

If you want to spice up those nails here's what you do

1- Paint a base coat that will coordinate well with the glitter.

2- While the paint is still wet generously sprinkle glitter on each nail and make sure it's totally covered. It's important to have a piece of wax or parchment paper underneath so that the excess glitter can be saved and/or reused. Shake your foot a few times to get any extra glitter off, or
you can also brush off some of the extra glitter with a small paint brush (because you WILL have glitter on the sides of your toes).

3- Paint a clear top coat over the top of the glitter to help seal it and to give it a little extra sparkle.

Additional Tips:
I used the Martha Stewart Gemstone Glitter Set that I bought at Walmart. It had a large variety of glitter to choose from.

Glitter on the outside of your toes is perfectly NORMAL. Just wait until the top coat dries, then wash off the excess.

I added another top coat the next morning just to make sure everything was sealed in.

Fabric Flowers


Materials:

Fabric (Can use coordinating fabrics)
(about 42" strip x 1 1/4" wide)
Needle & Thread OR Sewing Machine
Felt
Alligator Clip
Glue Gun

Topper:
Small clear glass marble (flat on one side), modge podge, & paper
or
Button
or
Fabric Covered Button
1.-Cut your strips of fabric to desired size
(I cut mine different sizes so I could layer them).
*tip: have fun and play around with various widths and lengths
2.- Hand stitch or sew along one edge of the fabric.
(If you are machine sewing do a loose basting stitch)

3. Once you have finished stitching, slowly pull the thread and the ribbon will begin pleating forming your flower.
(If doing this with a sewing machine, test which thread will give more easily by pulling on both pieces. Which ever string you can pull easier will be the one to use, be careful not to pull too hard, or else you'll have a broken string...boo.)

4. Start forming your flower/s and stitching in place.
(If you have more then 1 flower, glue gun them one on top on another, then stitch into place)

5-If making a glass marble, brush modge podge on the back of the marble, and glue onto your paper. Then cut off excess paper from the marble. Let dry. Then hot glue marble to fabric.

If using a button, either hot glue or stitch button to flower.


6.-Hot glue a piece of felt to the alligator clip. Then add more hot glue to the bottom of the alligator clip and fabric, then glue to the bottom of the flower.

(Hopefully you can understand this)


More Fabric Flower Links

From Wise Craft...fabric flower (includes a fabulous flower template)

From Little Birdie Secrets...(lots of other fabric tutorials)

How to use a digi scrap template in PSE


How to Use a Template in PS Elements

Have you ever used a template? If not...I will teach you!!! I swear these are the best things invented in digital scrapbooking. It takes the guess work out of trying to figure out a layout (the most time consuming part for me!). It's already done for you. Basically, to use a template, you can fill the grayscale shapes with digital papers, pictures, edit or replace elements and add embellishments, and edit or add text or word art.


FIRST STEP: Open the template, papers, pictures, and embellishments you want to use in Photoshop Elements.

SECOND STEP: Make the template layer active in your workspace. You're going to want to duplicate the template to avoid ruining the original file. To do this, simply go to the FILE menu, and select DUPLICATE. Are you with me? Good..let's continue!

THIRD STEP: I personally like to start with my pictures first. You can do papers first if you'd like. Simply drag and drop them onto your template layer. You will be able to see them show up on the sidebar
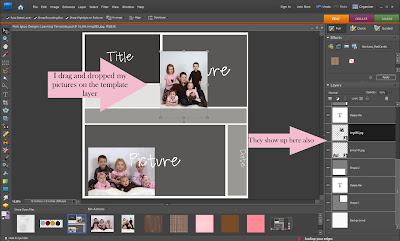

FOURTH STEP: Simply place the pictures ABOVE the shape you would like to merge.
(look at sample below)
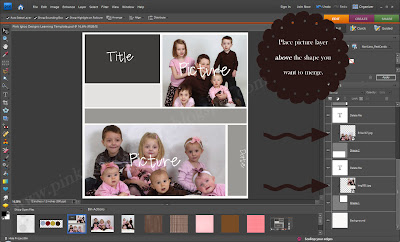
FIFTH STEP: Once you position your pictures/papers ABOVE the shape you'd like to merge, press ctrl G. Pressing ctrl g will merge the paper to the shape below. This technical term is called a "Clipping Group".

SIXTH STEP: You may re-size or move the image after pressing ctrl g to make sure everything is seen in the picture in that particular shape layer.

SEVENTH STEP: Continue adding and merging all papers and pictures. (See Below)
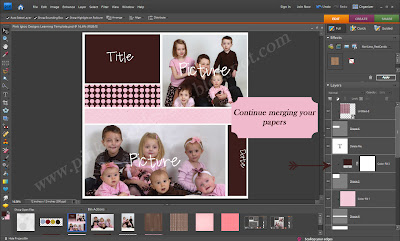
Eighth Step: Once you have finished clipping all papers and pictures, go through all the layers and find each layer that says "Delete Me". Delete them all. (See Below) (Not all templates have the layer that says "Delete Me". So just go though and delete all wording that you don't want on your page).
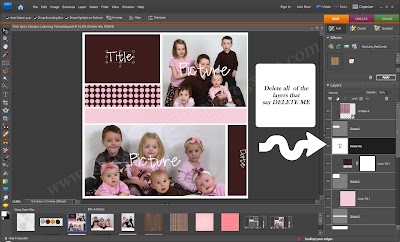
Ninth Step: Add any text titles, wording, dates, journaling, or word art you would like to apply.
Tenth Step: Add any embellishments, brads, clips, etc.

Eleventh Step: Go to LAYER then to MERGE VISIBLE. (Or shift+ ctrl+ e) This will merge all of your layers together. After you merge layers, you won't be able to edit your text or photo layers, so make sure that your beautiful masterpiece is finished before merging!
(I know this isn't anything fancy, but hopefully it'll help you learn a little more about templates and how to use them! Enjoy, and good luck!)


Some FABULOUS places to find free digital scrapbooking kits and templates are:
IKEA GODDESS
&
DIGI FREE
