How to Use a Template in PS Elements
Have you ever used a template? If not...I will teach you!!! I swear these are the best things invented in digital scrapbooking. It takes the guess work out of trying to figure out a layout (the most time consuming part for me!). It's already done for you. Basically, to use a template, you can fill the grayscale shapes with digital papers, pictures, edit or replace elements and add embellishments, and edit or add text or word art.
 FIRST STEP: Open the template, papers, pictures, and embellishments you want to use in Photoshop Elements.
SECOND STEP: Make the template layer active in your workspace. You're going to want to duplicate the template to avoid ruining the original file. To do this, simply go to the FILE menu, and select DUPLICATE. Are you with me? Good..let's continue!
THIRD STEP: I personally like to start with my pictures first. You can do papers first if you'd like. Simply drag and drop them onto your template layer. You will be able to see them show up on the sidebar
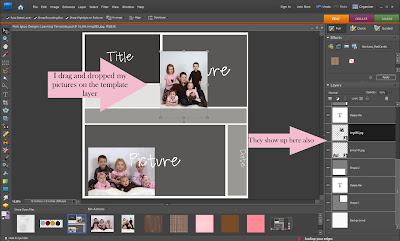 FOURTH STEP: Simply place the pictures ABOVE the shape you would like to merge.
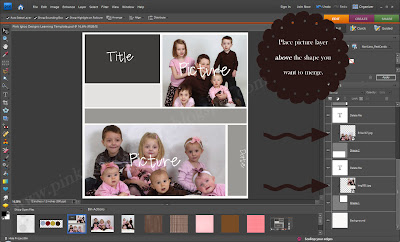 FIFTH STEP: Once you position your pictures/papers ABOVE the shape you'd like to merge, press ctrl G. Pressing ctrl g will merge the paper to the shape below. This technical term is called a "Clipping Group".
SIXTH STEP: You may re-size or move the image after pressing ctrl g to make sure everything is seen in the picture in that particular shape layer.
SEVENTH STEP: Continue adding and merging all papers and pictures. (See Below)
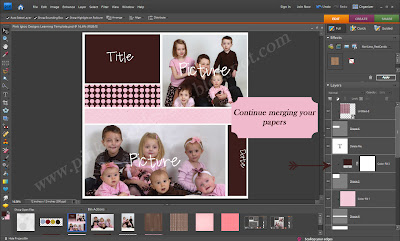 Eighth Step: Once you have finished clipping all papers and pictures, go through all the layers and find each layer that says "Delete Me". Delete them all. (See Below) (Not all templates have the layer that says "Delete Me". So just go though and delete all wording that you don't want on your page).
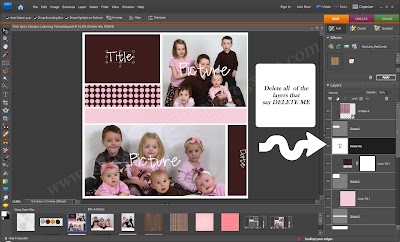 Ninth Step: Add any text titles, wording, dates, journaling, or word art you would like to apply.
Tenth Step: Add any embellishments, brads, clips, etc.
Eleventh Step: Go to LAYER then to MERGE VISIBLE. (Or shift+ ctrl+ e) This will merge all of your layers together. After you merge layers, you won't be able to edit your text or photo layers, so make sure that your beautiful masterpiece is finished before merging!
 (I know this isn't anything fancy, but hopefully it'll help you learn a little more about templates and how to use them! Enjoy, and good luck!)
Some FABULOUS places to find free digital scrapbooking kits and templates are:
IKEA GODDESS
&
DIGI FREE




 How to use a digi scrap template in PSE


