Live Near Salt Lake?

{Please DO NOT copy Brandee's Picts.}
If you live in Salt Lake or are near the Salt Lake area, you may be interested!!!! Some friends of mine host a monthly craft class. They have some REALLY cute crafts offered at very reasonable prices. So if you're looking for a little "Me" time, you need to check it out.
You can visit Brandee's Blog HERE if you are interested!
{Plus I heard they have great drawings/prizes if you go!}

It's All In My Head!

I recently came across Stefanee's blog called It's All in My Head. It's great eye candy! So put your kids down for a nap, grab a nice cup of hot cocoa, and get lost in Stefanee's world for a few minutes...or hours! I love her fun recipes and craft ideas! I think some of her ideas would make great visiting teaching gifts! You have to check it out! Enjoy!


{Stef was kind enough to let us use these pictures,
please do not copy these without her permission, Thank you}


Where have I been?

Holy smokes am I behind!! I've had such great intentions of posting all the fun crafts I've been doing, but I haven't had the time.
I am currently working on a request of headbands, bows and such! I'm nearly finished and it'll be posted soon. But as for now, check out a few of my latest projects I've been doing (for my craft class).

Addi & I saw a project similar to this on Martha Stewart, so we took time to make Addi her own "Smelly Doll" named Rosabelle. If you would like the instructions (they don't have the doll template, you'll have to make your own) you can find them HERE.
However Addi and I added an extra special touch to make her a doll that smelled good. So we added a touch of laundry detergent (gain) and a dryer sheet inside the doll along with the polyfill. This is the finished product!

(Don't mind Addi's little Kool-Aid moustache, we think it's permanent!)

And these are the crafts I have been working on for a craft class this weekend at my house. A personal super saturday of sorts!

Photobucket
Photobucket
Photobucket
Photobucket
Photobucket
Photobucket
Photobucket
Photobucket


Enjoy! BTW if you do go to my Off The Wall Creations site, mind you it is not complete, check back in a few weeks.

A closer look


Lori, here is a closer look at the dividers in my recipe box. To answer your question about the purpose of the ribbon...well, it's simply just decorative, no real purpose!!
I bought the alphabetical dividers for index cards at walmart, and I glued scrapbooking paper over them. I added some embellishments, and stapled ribbon to the top.
Hopefully this helped!
-Erika

TREATS!

Photobucket


I want to let you in on a little fun craft!

***Purchased paper mache letters from Joanns.
***Purchased clear finishing spray paint from home depot.
***Purchased large shaker of gold glitter from Walmart.

1-In a well ventilated area spread the letters across newspaper (make sure you get two different sets of newspaper laid out). (I laid my letters down facing up.)
2- Spray the clear finishing spray over the tops of the letters. Quickly lay the letters down on the second piece of newspaper and GENEROUSLY sprinkle glitter all over the top of the letter.
3-Shake off the excess glitter and pour it back into the glitter container.
4-Let it dry for about 10 minutes.
5-Move the letters to the first piece of newspaper (which may be a little sticky from the spray)
6-Lay the letters on their sides and repeat the process until all of the letters are smothered in glitter!
Enjoy!!

*BTW-Martha Stewart has come out with some FUN colored glitter you may want to try. It can be purchased at Walmart.

Let me know if I can answer any questions

Halloween Happiness Links

DIY Spooky Blocks
Caramel Apples without the Calories (decor)
Paper Pumpkin
Mini Caramel Apples
Cheesecloth Ghosts
Spooky Yards
Halloween Pancakes
Ghost Pancakes
Ice Cream Grave
LOTS of Halloween food ideas
Sinister Smile Snacks
Vintage Bliss Home Decorating
FGH Decorating
BOO you're neighbor
Boo Picture Frame
Boo Letters
Halloween Decorating on a budget
Ghostly Marshmallows
Make green goop
Morris Family Home Decorating
Boo Frame
Twinkles Tricks and Treats Decor
Fall Banner
Trick Or Treat Banner
Halloween Pass it along plates

Pumpkin Stand

Photobucket

This is a quick and easy holiday decoration.
Simply place medium Sized "Pie" pumpkins on candle holders.
(Not the tiny pumpkins )
Wrap raffia around the middle of the pumpkin
Place on the stands
Enjoy!

Halloween Links

Morris Family Decorations -Way cute!
Halloween Wreaths and Garlands
Cute Halloween Banner
Halloween Quiet Book
Halloween Advent

Check Out These Shoppes

LatterDay Keepsakes
Baby Steals
Anything Goes-The Blog Shoppe
Emmie Cakes
Extra Ordinary Moments
Seriously Adorable

Cards, Stationary, and Announcements

Address To Impress
Doodle Bugs Stationary
Ellie Bellies
Heavenly Press

DIY Fall Tile Board


Hopefully you're all ready for fall! Here's a fun little DIY fall project.

30" x 6" pre-cut board *Optional: 1" allowable routed edge

Spray paint (we used "Espresso" satin finish made by Rust-oleum Painters Touch from Home Depot)

6 4 x 4 white tiles

Mod Podge (deco-podge)

Sponge brush

60 Grit Sandpaper

Optional: Brayer (small roller used for wallpapering)

Industrial Strength Glue (E6000, works well and can be found at hardware or craft stores)

(2) white cardstock


1.) Cut, route, sand, and dust a 30" x 6" board. Paint the board your desired color. Let dry overnight.
2.) If you get glossy tile, lightly sand it to take a little of the finish off. Your paper will adhere better.
3.) Download and print the decals and FALL letters onto white cardstock. Cut out each letter and decal. An actual size of a 4 x 4 tile is 4.25 x 4.25 and each letter and decal I made is a 4 x 4, so it won't fill the tile. Apply a thin coat of Mod podge. Brush it evenly in one direction. With clean hands, carefully center the paper on the tile. It doesn't dry immediately, so you have a little time to adjust accordingly. Position your photo and press down firmly. Use the brayer (mini roller) to smooth out the photo and remove any bubbles, or lightly press until all bubbles are removed. Let it dry for about 30 minutes.
4.) Spread an even thin layer of Mod podge on top of the tile (over the picture). Brush it all in one direction. Wait about 15 minutes to dry. Brush a second coat of Mod Podge. Let it dry for a few hours.
5.) Lay your tiles across the wood board before gluing them down. Space accordingly. Take the tile one at a time and spread glue across the back of the tile. Press the tile to the board in the desired spot.
6.)Let dry over night

FALL LETTERS


BIG THANKS TO DANI MOGSTAD
who is the designer of this amazing digital scrapbooking kit that was used
to make the tile board. She was kind enough to give us the right to use and share the FALL words and decals with YOU!
Please visit her Blog and tell her THANK YOU:
then please visit her shop at
If you would like to purchase the full spookable kit click on the link below


Cute Pre-Made Blogger Templates Links

Allie Brown's Layouts


Lee Lou Blog Designs

Leelou Blogs

Cutest Blog On The Block

TCBOTB

Matie Kay Creations

Simply Fabulous Blog Templates

Family Magazines

Family Fun Magazine
Family Circle Magazine
Parents Magazine
Real Simple Magazine

A Few Of My Favorites

Tip Junkie- My favorite Blog of all times!!!!!
Parties and Holidays -My cousin Jadi's blog of all kids of crafts and ideas!
Blissfully Domestic- One word...WOW!
Inspire Me Crafts -One VERY crafty and creative Lady! Lots of ideas!
Executive Homemaker -Lots of Ideas and Printables
Craft Tutorials- Lots of craft tutorials
Today's Creative Blog -Exploring a creative blog daily
Digi free- TONS of free digital scrapbooking kits, papers, and embellishments
Ikea Goddess TONS of free digital scrapbooking kits, papers, and embellishments
Lehi Crafters My friend Colettes super saturday ideas and kits
You can make this! Puchase fun patterns of all sorts!

Digital Scrapbooking Tutorials

Banner Woman
CG Essentials
Cottage Arts
Design With Renee
Digital Scrapbook Place
Digital Scrapbooking Tutorials
Hummies World
Kim Lizzy
Misty Cato Designs
Mommy Scraps
My Janee
Pages Of The Heart
Photoshop Elements Tips
Pickle Berry Pop
Purple Flowers
Scrap Girls
Scrap Outside The Box
Scrapbook Bytes
Scrapbook Bytes (designing)
Scrapbook Elements
Scrapbook Graphics
Scrappers Guide
Scrappers Guide
Two Peas In A Bucket Tutorials
Web Work Site
Web Work Site
Witty Living

Photoshop Elements Tutorials

Photoshop Elements Tutorials

Scrapbooking Cards

Emily Giovanni Cards
Capture The Moment
Stacy's paper Crafts
Dannie's Designs
Cute Homemade Cards with tutorials
Di Hickman

Cute Bows

Bowlicious Bowtique -My friend rachels Bows for CHEAP
Brynns Bows and Blossoms
Baby Bands
Cherry Blossom Designs
Knot Heads
Oh Sew Girlie

Font Links

Font Space
Erfifonts
Lady Snow Fonts
Font Browser
Kats Fun Fonts
Jen Strange
101 Free Fonts
Da Font
Ding Bat Depot
Amanda's Cute Scrap fonts
Dingbats 1

Digital Scrapbooking Links


3 Scrapateers
A Cherry On Top
Atomic Cupcake
Designer Digitals
Designs By Dani
Designs By Krista
Digital Candy
Digital scrapbook Previews-Bagde Album
Digital Scrapbooking.Org
Freebies- Digi Free
Freebies- Ikea Goddess
Freebies-Gratuit
GG Digital Designs
Happy Scrap Girl
Jen Jen's Tutorials
Peppermint Creative
Polka Dot Potato
Scrap Andrea
Scrap Orchard
Scrapbook Bytes
Scrapbook Elements
Scrapbooking Freestyle-Exploding Box
The Shabby Shoppe-Badge album kit

Digital Scrapbooking Freebies

**Digi Free**
**Ikea Goddess**
Digi Treats
Angel wings n things
Free photoshop actions
Free Photoshop Brushes
Genedes Blog
Mad Cropper
Misty Cato Designs
Moo Two Designs
Pretty Scrappy
Raspberry Road Designs
Scrap Angels
Scrap Gratuit
Scrapbook Bytes
Sketch This
Urban Dragon Digital Art

Take A Look

Today's Creative Blog
Joys Of Home
Pink Christmas
The Little Things
According to Kelly
Aged Vintage Papier

2 Clever Blog
Joys Hope

Pure Craftiness

How about Orange
Craft Tutorials
Oh So Crafty
A Bushel And A Peck
A Soft Place To Land
Celebrate Creativity in all it's forms
Melanies Musings
Over The Tipsy Top Design
Joys Of Home
Crafty Lolly
Ga Ga for Garlands
Pursuit Of Craftyness
Tutus and Turtles
Inspiring Ideas

She's got it ALL!

Rocks In My Dryer
How about Orange
A Bushel And A Peck
Unwrapped
Laurie Turk
Living Locurto
Tutu's and Turtles
11th Heaven's Homemaking Heaven

Lots-O-Tutorials

Lots of Craft Tutorials
Joys of Home Tutorials (Cute)
create own coloring pages from pictures
How to make a twined initial monogram
Childrens Pop Art on canvas
Headband 1
Wheat Sack Tutorial
How to make a exploding box (Scrapbooking)
Make cheap art
Notebook/Purse Tutorial
Outlet Covers
organize your digital Photos
Bitty Booties
How to make a duct tape bull whip
How to make a crayon roll
Make homemade paper fortune cookies
Furniture Re-Do..101
Paint chip sample card
Rag-Ball Ornament
Make a framed chalk board
Things to do with old t-shirts
Instructions for "antique" looking clock
How to make a FRENCH KNOT for embroidery/stitchery
Headboard Garden Sign
Make Fruit Filled Scones
Make An Apple Topiary
Make A Flower Filled Paper Cone
Make A Tag Book
Itty Bitty Pink & White Christmas Trees
How to cover a photo canvas
Make Oobleck
Picture Marble Magnets!
Glitter Pumpkins and Indian Corn for Fall
Pretty Pink Scarves
Katie Brown-Inspired Fleece Blankets
Ultrasuede Fall Placemats
Forcing Amaryllis and Paperwhite Bulbs
Covering Bookcase Shelve Backs with Fabric
Buckeye Garland
Magnolia Garland
Perfume Sachets
Fleece Scarves with Fringe in Team Colors
Square Chanukah Feather Wreath
Round Pink Feather Wreath
Melt and Pour Glycerin Soap
Beeswax Candles
Bottle Tree
Sushi Magnets from Sculpey Clay
Button / Shell Necklace
I Love You Banner for Valentine's Day
Felt Cupcakes with Sprinkles
Adding Fringe to a Knit Scarf
Mardi Gras Feather Boa and Decorations
Making a Knitted Necklace
Birthday Cake from Felt
Felt Hamentaschen Refrigerator Magnets
Felt Ice Cream Cone
Design a Welcome Mat
Giant Paper Pom-Poms
Making Chalkware from Chocolate Molds
How to Make Felt Balls
Independence Day Tassel/Doorhanger
Bottlecap Magnets and Thumbtacks
Painting Already-Glazed Ceramic Pieces
Embellishing Canning Lids
Making Night Lights With Shrinky Dinks
Homemade Brown Sugar Scrub
Shrinky Dink Magnets
Football Season Challah Cover
Making a Mosaic Table
Scrapbook Paper-Decorated Birdhouses
Making an Upholstered Headboard
Updating an Armoire with...Chalkboard Paint
Making an Indian Corn Swag for Fall
Making Resin-Poured Decorated Bottlecaps
Organizing and Labeling with Scrabble Tiles
Domino Magnets and Thumbtacks
Valentine's Day Ribbon Wreath
Make Your Own Lip Balm
Watermelon Sculpey Magnets and Thumbtacks
Page Pebble Refrigerator Magnets
Custom Pic Shelf / Drawer Liners
Homemade Postcards
Monkey Bowl
Jingle Bell Wreath For My Xmas Friends
Ornament Wreath For My Xmas Friends
Making Magnets from Scrapbooking Brads
Mardi Gras Wreath / Ornament Wreath
Preppy St. Patrick's Day Banner / Garland
Springtime Wreath
Salt and Pepper Shaker Tassel
Menu Placemats for Children
Making a Retro Watering Can
Making Cabinets Into Custom Garden Furniture
Framing Handed Down Recipe Cards
Sculpey Apple Magnets and Thumbtacks
Stenciled Paper Banner and R/H Decorations

Things I GOTTA Make!

Personalized Growth Chart Tutorial
Make a hooded towel
FAMILY- A journey to forever frame
Make an exploding box
Make a Etched glass dish *Tutorial
Make a custom Silhouette T-Shirt Of Your Kids *Tutorial
Make a Tulle headband
Make cute banners
Make own custom postcards 20 for $20 from Moo
Print picture on canvas with photofiddle
Taste Book -Make your own personalized hardbound cookbook for $35
Cute Flower cake made out of twinkies


Font Links

Free Initial Ornaments
Army Dingbats
Font Space
Erfifonts
Lady Snow Fonts
Font Browser
Kats Fun Fonts
Jen Strange
101 Free Fonts
Da Font
Ding Bat Depot
Amanda's Cute Scrap fonts
Dingbats 1

Blogging Links

Easy Custom Blog Helps
Add more pictures row by row or side by side
Web Design Tutorials
Add navigation bar in header image
Horizontal Menu Navigational bar
How to remove navbar in blogger
3 Column Template XTML
Free Copy Right Protection
"Simply Fabulous" Tutorials
Make a button for blogger
Newsletter Registration Form
Blogging tutorials by RS
How to disable right clicking in blog
How To Make Blog Pictures Large
How to make a blinkie
How to make a favicon
Pixie Color Picker
Font Browser
Pick A Color Scheme From A Photo...cool!
Citrus Moon
Color Scheme
how to Live Love Life-blogging helps
Blogging Basics
Blogger University***learn something new
Make A Tab Menu For Your Blog
Blogger Tricks
Cute Free Blog Layouts-Leelou Blogs
How to make a label cloud
Contact us box
Moms Who Blog
How to Video Blog
How to add scrapbooking paper to your blog
Some Cute Headers
Blogger University
Tutorial for 3 Column Templates Like This One
Dressing Up Your Blog
Blogger Buster
Tips For Bloggers

Photography Links


21 settings you should know

Photo Jo-Jo-Fun ideas using pictures

Mamarazzi School

The Pioneer Woman Photography
Better Photo

Pay It Forward Photography Blog
How to soften a photo using PSE

All Pop Art
Spraguelab- Photoshop elements tutorials
Picnik

Sewing Links

Video Library of Hand Emroidery
Primrose Designs-Different Stitches
Oh My Stars Sewing Tuts.
Cute Fabric for $8 a yard
Heather Bailey & a few of her tutorials
Tutorial- how to make a yo-yo quilt
Artsy Crafty Babe..Like her links of things she wants to make
Creative Little Daisy
Sparkle Power Sew Along Tutorials
What the craft sewing tutorials
Cute Baby Blanket

Home Decor

Shops

Land Of Nod
Not too shabby
The Wood Connection
Just You & Me Home Decor
Pottery Barn Kids
Pottery Barn Teen
Pottery Barn

How To Make A Wordle


Go To:
http://wordle.net/create

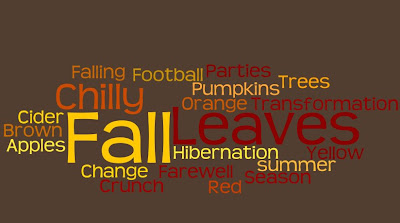
*Think of a theme for example...Fall

*Next, think of all the words that have to do with the subject
So Here's What I come up with

Fall
Fall
Fall
Fall
Leaves
Leaves
Leaves
Pumpkins
Chilly
Chilly
Crunch
Apples
Cider
Football
Trees
Hibernation
Parties
Orange
Red
Yellow
Brown
Transformation
Season
Change
Falling
Farewell to summer
*****You can't really save this so make sure when you're done typing your words, you copy and paste them in word so you can retrieve them for later use in case something gets deleted. you'll see what I mean.****

*The reason for the repetitive words is because the more times it's written, the more it will stand out. So Fall, Leaves, and Chilly should stand out.

*Then Press Go

*It will automatically pick your colors, layout, and font for you. But, If you don't like them, you can customize them to your liking. Here's how:

-Find the button under the wordle that says "Randomize". This will rearrange the words in another arrangement. Click it until you're happy with it.

-Edit: Undo or redo things
-Language: You can change the language, or make it all uppercase, or lower case
-Font: Pick a font, they have numerous options
-Layout: You can choose to have it in alphabetical order, horizontal, vertical,etc.
-Color:I like to personalize mine to my own colors.

Here are the steps:
-Go to Color

-Then Pick "Edit Custom Palette"

-You can pick up to 5 custom colors.

-Now to get technical....colors are defined by a color code, or AKA as The Hex color code. Each color has a number. I have included a SIMPLE color code (believe me, there are A LOT of colors out there, and if you don't like what you see on this color code, google Hex color code and you can find exactly the color you're looking for.)


-In this particular wordle, I'll pick fall tones.


Then if you're happy with everything you have a couple of options.


#1: Underneath the wordle, you'll find a button that says "Open In Window" then you can print from there. It will print out as a 8 X 10


#2: You can take a screen shot from your computer (if you don't know how...google it). Then paste it into any photo editing software where you can crop it, and resize it to your liking.


*FRAME IT! It makes a Wonderful personalized decoration for you house!


*If you have any other questions about wordle, look in the FAQ section

LDS Links

*If you know of anyother helpful links please leave them in the comment box
*I will be adding more links in the near future
LDS MAIN

Study

Read Your Scriptures Online

Read The Scriptures -Pick a starting point and have it emailed to you


A little bit of Everything
(Family Home Evening * Crafts * Ideas)

Primary

Young Women


Activity Days/Faith In God
LDS Activity days

Young Men


Relief Society


Family Home Evening

FHE Helps & Idea -The Idea door
Quick FHE ideas
Family Home Evenings -Bella Online
Family Home Evening -Light Planet


Home Teaching
Missionary


Seminary


Magazines

The Ensign

The Friend

New Era

The Liahona

LDS Living

Stories & Poems


Music


Temples


Clipart


Geneaology


Broadcasting

(TV * Internet * Radio)


Service

Clothing


Scouts


LDS Crafty
Food Storage
Misc.

LDS Links


Links For Kids

Kid Crafts

Mom Links

Photobucket

MomDot


5 minutes for mom

Organizing Links

Complete Organizing Solutions

Organizing Junkie

Come 2 Order

Organized Home

Creative Organizing

FlyLady

My Personal Organizer

Lazy Organizer

Monica Ricci

Real Simple Magazine

Tile Picture


Items Needed:

12 x 12 Tile (I used a smooth matte finished piece of tile)
Spray Adhesive
Modge Podge (decoupage)
Scissors
Sponge Brush
12 x 12 printed picture

Make sure the picture is cut to fit the 12 x 12 tile. (I printed my picture at home using my Epson printer that does 12 x 12s. I had a little excess paper on the side of my picture so I turned the picture upside down, placed my tile on the back of the picture and I traced around the tile with my pencil. Then I cut on the pencil line, so now my picture will fit perfectly on the tile.
Spray the tile with your spray adhesive. Press your picture on the tile. Let it dry. "Paint" modge podge over your picture to seal it over the tile. Let dry

*If your picture bubbles because of the modge podge wait until it's nearly dry then gently press down with your finger until it sticks.

Good Luck!

This has become one of my favorite crafts of all time. They will make perfect gifts!

Fruit Bouquet

First, you'll need to decide what fruit you want to incorporate into you fruit bouquet. We used fresh pineapple, strawberries, cantaloupe, grapes, watermelon, honeydew melon, oranges, and even though we didn't use parsley I would highly recommend getting some!

You will also need a few other items to make this edible fruit bouquet: a flower cookie cutter, a knife, a melon baller, kitchen scissors, bamboo skewers, a cutting board, a vase or basket and some floral foam

Step 1. Using your knife, cut up your pineapple, half of honeydew melon, half of watermelon, half of cantaloupe into 1/2 inch thick slices.


Step 2. Using the cookie cutter, press each slice of fruit and cut out a flower

Step 3. Using the melon baller scoop several pieces of watermelon, honeydew melon, and cantaloupe
*We also sliced grapes in half


(Don't mind Addi's picture..HA!)

Step 4. Now add 2 grapes on the bamboo skewer. Add the fruit flower on top. Make sure the skewer pokes through the fruit. Push the fruit down leaving about 1/2 " from the top. Now stick that part of the skewer onto either a watermelon, cantaloupe, honeydew melon ball, or a half of grape. Don't let the skewer stick out the end. Do this for each "Fruit flower".
*The purpose of the grapes is to help support the fruit flowers so they don't slide down the skewer.

Step 5. Wash your strawberries (you can remove the strawberry leaves if you want). Add a few grapes on the skewer. Then take each strawberry and stick a bamboo skewer into the top of it, but don't let the skewer poke out the other side.

Step 6. Take a bamboo skewer and stick it through about 6-7 grapes. When you stick one grape on, slide it down to make room for the next one. Repeat this until your last grape. Make sure that the skewer doesn't stick out of the last grape (the one on top). Then slide each grape up the skewer until they touch the grape just above it. I made 7 of these grape skewers for this fruit bouquet.

*I also put oranges on skewers

Step 7. Put your floral foam into your vase or basket. (Don't use a clear vase, it's not pretty!!!)


Step 8. Now you should have all of your fruit on skewers. Place each skewer into the floral foam at various angles. You will want to create a spherical shape to the bouquet, so place the outermost skewers on a large angle and make them shorter than the center skewers. I had to break a few inches off some of the skewers to get them to the right height (I used kitchen scissors to help me break the skewers). This step is the most time consuming because you want the bouquet to look perfect. If you have trouble, just start putting in skewers into the foam. Then adjust each one to look how you want it. The key to this step is to adjust your skewer lengths. Don't be afraid to break a good part of the skewer off (if you break too much off, you can always use a new skewer - I had a LOT of extra skewers at the end). Another key to making your fruit bouquet look AWESOME is to have plenty of fruit. Having too few fruit skewers makes your fruit bouquet look bare and skimpy.


Step 9. Once all your fruit skewers are placed, place some twigs of parsley in-between the skewers. This fills in the bouquet, hides the skewers and makes it look more like a flower bouquet.


Once you have the parsley in place, YOU ARE DONE! WA-HOO! Your family will love you FOREVER!


***EFG***(Especially for Grandchildren)


As many of you know I come across most of my craft ideas through blog hopping. I was fortunate to come across Megans Blog. Megan is what I would consider another one of those cute "Do-It-All" moms. Without people like her I would have no posts for my craft blog. So here's her *BrILlIaNt* ideas! …But…You'll have to check out MEGANS blog to see the details!


MEGANS FIRST POST'


MEGANS SECOND POST

Cute Little Girl Hairstyles Links

Advent In August?

I know, I know.. Advent Ideas in August? I came across THIS cute ladies site and she had some ideas to do for a super Saturday. I just thought it would be fun to get ahead of Christmas Crafts this year, plus we're not really doing anything crafty this super Saturday in our ward, so I thought I'd have my own fun day.
I think I like the muffin tin idea the best (Bottom pic) because you can put little trinkets and notes inside for kids to open daily. It reminds me of when I was a kid and my mom and dad would buy those chocolate advent calendars from school fundraisers. We would take turns opening it and eating the chocolate. 2 years ago my mom gave our little family a new advent wall hanging that has pockets. She is so thoughtful and put little notes, or presents in the pockets daily. Such as money to buy to take the kids out for an ice cream, ideas to do with the kids, little love notes, etc. My kids were so excited to see what Grandma had put in the pockets for that day.